Installing xrdp 9.3.1 and xorgxrdp 2.4 on Debian Stretch

This is similar to the previous xrdp and xorgxrdp how-to, it is just adjusting to the newer versions of all the pieces of software.

This how-to is based on the install instructions from XRDP’s github pages for installing on Debian 8.

Install xrdp’s dependencies:

$ sudo apt-get install git autoconf libtool pkg-config gcc g++ make libssl-dev libpam0g-dev libjpeg-dev libx11-dev libxfixes-dev libxrandr-dev flex bison libxml2-dev intltool xsltproc xutils-dev python-libxml2 g++ xutils libfuse-dev libmp3lame-dev nasm libpixman-1-dev xserver-xorg-dev

Get the xrdp and xorgxrdp sources:

$ mkdir -p GIT-sources/neutrinolabs
$ cd GIT-sources/neutrinolabs
$ wget https://github.com/neutrinolabs/xrdp/releases/download/v0.9.3.1/xrdp-0.9.3.1.tar.gz
$ wget https://github.com/neutrinolabs/xorgxrdp/releases/download/v0.2.4/xorgxrdp-0.2.4.tar.gz

Building and installing xrdp:

$ cd GIT-sources/neutrinolabs
$ tar xvfz xrdp-0.9.3.1.tar.gz
$ cd xrdp-0.9.3.1
$ ./bootstrap
$ ./configure --enable-fuse --enable-mp3lame --enable-pixman --enable-sound
$ make -j2
$ sudo make install
$ sudo ln -s /usr/local/sbin/xrdp{,-sesman} /usr/sbin

Building and installing xorgxrdp:

$ cd GIT-sources/neutrinolabs
$ tar xvfz xorgxrdp-0.2.4.tar.gz
$ cd xorgxrdp-0.2.4
$ ./bootstrap
$ ./configure
$ make -j2
$ sudo make install

Generate keys:

$ sudo xrdp-keygen xrdp auto 2048

Building the pulseaudio modules:

$ cd ~
$ mkdir -p Release-sources/pulseaudio
$ cd Release-sources/pulseaudio
$ sudo apt-get install dpkg-dev
$ sudo apt-get source pulseaudio
$ sudo apt-get build-dep pulseaudio

Change the permisions on the pulseaudio directory to your user:

$ sudo chown -R [USER]:[GROUP] pulseaudio-10.0
$ cd pulseaudio-10.0
$ ./configure

In change directory to “~/GIT-sources/neutrinolabs/xrdp-0.9.3/sesman/chansrv/pulse”

$ cd ~
$ cd GIT-sources/neutrinolabs/xrdp-0.9.3.1/sesman/chansrv/pulse

Edit the Makefile with your favorite editor and point it to the sources for pulseaudio by changing:

PULSE_DIR = /tmp/pulseaudio-10.0

to:

PULSE_DIR = ../../../../../../Release-sources/pulseaudio/pulseaudio-10.0

then:

$ make -j2

If the build is successful , copy the 2 modules to /usr/lib/pulse-10.0/modules.

$ sudo cp module-xrdp*.so /usr/lib/pulse-10.0/modules

Check the /usr/lib/pulse-10.0/modules directory:

$ ls -al /usr/lib/pulse-10.0/modules

If necessary, fix the ownership and permissions on the two modules:

$ cd /usr/lib/pulse-10.0/modules
$ sudo chown root:root module-xrdp-s*.so
$ sudo chmod 644 module-xrdp-s*.so

The modules are named module-xrdp-sink.so and module-xrdp-source.so

Enable the services:

$ sudo systemctl enable xrdp.service
$ sudo systemctl enable xrdp-sesman.service

Fixes for possible issues:

To run it as terminal server (also useful for Guacamole) add allowed_users=anybody to /etc/X11/Xwrapper.config to allow anybody to start X

To fix the thinclient_drives share error when connected via RDP to the client:

$ sudo umount thinclient_drives

logout and re-login via rdp
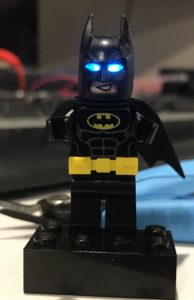
 

Lego Batman — Making the minifigure look more like it does in the movie

My son has a fascination with Lego Batman.  Ok, I may have a bit to do with his fascination with Lego Batman, I’m the one that taught him to play it on our very old (but still functional) Wii.  When the Lego Batman movie came out we took him to see it and in the days after my wife got him several minifigres related to it.

Looking at the Batman minifigure, it irked me a bit that in the Lego Batman Movie, Batman’s eyes look like they light up, but the real Lego minifigure does not have light up eyes. Since my wife managed to score more than one Batman minifigure I decided to “enhance” one of them to look more like the movie.

The process was crude and simple.  I basically cut a slit into the head of the minifigure using the dremel.  The slit is in the same general area where the cut-outs for the eyes on Batman’s mask line up.  I then proceeded to grind down a blue LED to fit into the minifigure’s head.  The only reason I chose to use a blue LED is because I have a bunch of them left over from other projects.

Once the LED was stuffed into the head and light was shining out from the slit, it was time to make some hole in the minifigure’s body to accommodate the wires to power the LED.  Initially I thought of just stuffing a small battery into the minifigure’s chest, I quickly gave up on that idea (not much room in there).  Instead I ran wires down a hole I drilled into the “neck ” of the minifigure, then down a hole I drilled into one of the hips and finally out through the bottom of one of the legs into a hole I also drilled into a Lego brick.  The next step is building a small power supply to stuff into the Lego brick (although I may end up using more than one).

Overall the effect is close to what is seen in the movie [insert picture].  Of course the minifigure is no longer useful as a toy…  It is now more of a “showpiece”…

Lego Batman

Pydio 8 with PHP 7 and SSL on Debian Stretch

Installing all dependencies:

# apt install mysql-server php7.0 php7.0-fpm php7.0-mysql php7.0-curl php7.0-json php7.0-gd php7.0-intl php7.0-mbstring php7.0-xml php7.0-zip php7.0-exif php7.0-apcu
apt install libapache2-mod-php

Ensure that apache support for PHP7 is enabled:

# a2enmod php7.0

Installing Pydio:

Download the installation archive.  Choose the Pydio Community Tar.gz archive.

Untar the archive into /var/www/html:

# cd /var/www/html
# tar -xvzf pydio-core-8.0.1.tar.gz

Fix permisions on folders:

# chown -R root:root pydio-core-8.0.1
# chown -R www-data:www-data pydio-core-8.0.1/data/

Create a symlink to the Pydio installation:

# ln -s pydio-core-8.0.1 pydio

In /etc/php/7.0/apache2/php.ini change:

output_buffering = 4096

to:

output_buffering = off

Creating self-signed certificates for Pydio:

# openssl req -x509 -nodes -days 1460 -newkey rsa:2048 -keyout /etc/ssl/private/pydio-selfsigned.key -out /etc/ssl/certs/pydio-selfsigned.crt
# openssl x509 -in /etc/ssl/certs/pydio-selfsigned.crt -out /etc/ssl/certs/pydio-selfsigned.pem -outform PEM

Configuring Apache for SSL:

Enable ssl on apache:

# a2enmod ssl

In the /etc/apalche2/sites-enabled directory:

# rm 000-default.conf
# ln -s ../sites-available/default-ssl.conf default-ssl.conf

In default-ssl.conf change the follwing line from:

SSLCertificateFile /etc/ssl/certs/ssl-cert-snakeoil.pem

To:

SSLCertificateFile /etc/ssl/certs/pydio-selfsigned.pem

Also change the following line from:

SSLCertificateKeyFile /etc/ssl/private/ssl-cert-snakeoil.key

To:

SSLCertificateKeyFile /etc/ssl/private/pydio-selfsigned.key

Configuring Apache for Pydio:

Create a configuration file on /etc/apache2/conf-available:

# cd /etc/apache2/conf-available
# vi pydio.conf

In pydio.conf add the following:

Directory /var/www/html/pydio>
Options Indexes FollowSymlinks
AllowOverride All
Require all granted
</Directory>

Once finished creating /etc/apache2/conf-available/pydio.conf create a symlink to it in /etc/apache2/conf-enabled:

# cd /etc/apache2/conf-enabled
# ln -s ../conf-available/pydio.conf pydio.conf

Restart Apache:

# systemctl restart apache2

Configuring MySQL/MariaDB:

Setup a password for Mysql/Mariadb (follow the prompts):

# mysql_secure_installation

Creating the database and user for Pydio

Create the pydio database:

# mysql -u root -p
create database pydio;

Create a database user for Pydio to use and grant it all access to the pydio database:

create user 'webuser'@'localhost' identified by 'USE A REALLY LONG AND STRONG PASSWORD';
GRANT ALL on pydio.* to 'webuser'@'localhost' identified by 'USE A REALLY LONG AND STRONG PASSWORD';

Final configuration:

To finish configuration, using a browser visit https://[URL of Server]/pydio and follow the prompts.  Keep in mind the names you used in the steps above for the Pydio database and the Pydio database user, you will need them for configuration.