My son asked me, “Dad, can we make a circuit that turns a light on when it is dark?”… Went to the parts drawers, got some stuff together, drew up the circuit and he put it together on a breadboard. Notice the new breadboard, had to order some from Amazon as I ran out of them.
A Counter using a 555 Timer
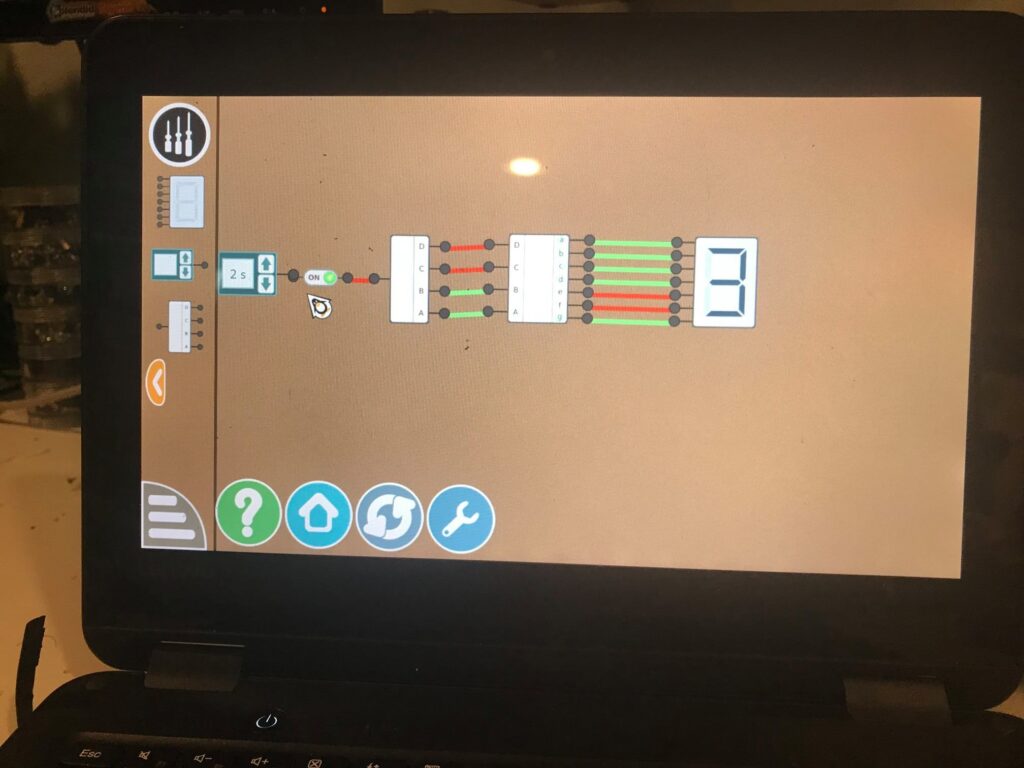
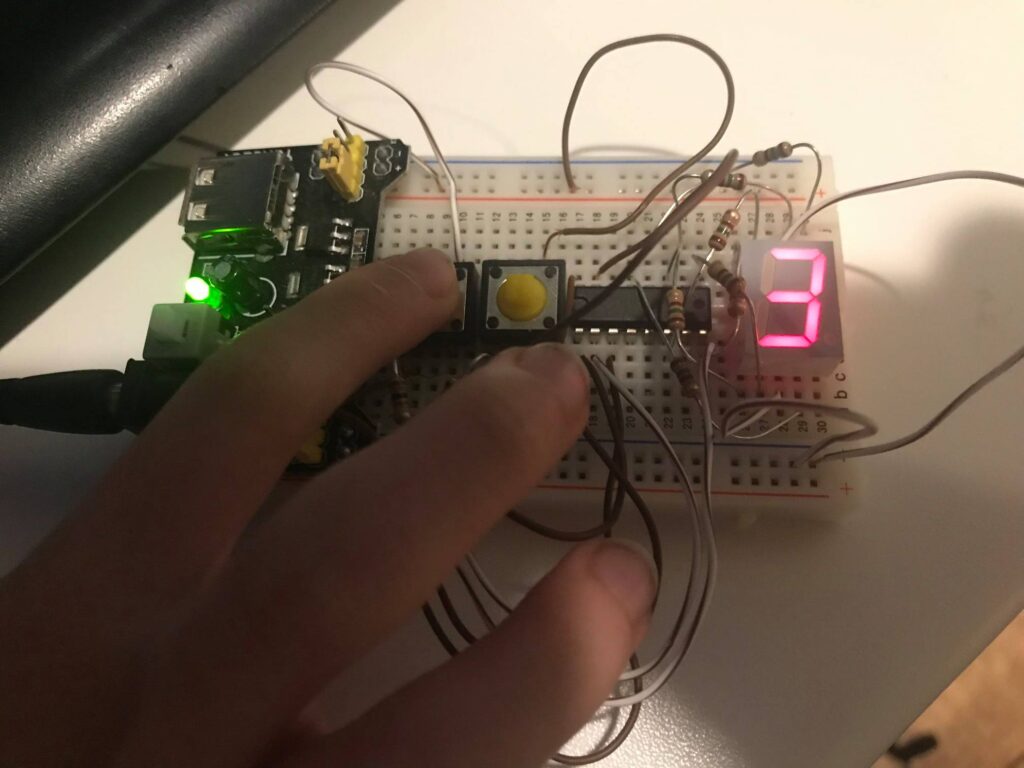
So my son wanted to expand the functions of the circuit we put together. He asked if we could make it count by itself and then proceeded to show me how it does this on his laptop… Ok, went through the parts drawers again and found suitable replacements for the parts needed (555 is the main thing). I drew up the design for the circuit and he put it together.
A simple counter circuit
So my son was playing on his laptop and found a circuit simulation program that is part of GCompris (Open Source Educational software). He “desgined” a simple counter on it, when I saw what he made I asked him if he wanted to make it with real parts… He said yes. A bit of searching in my spare parts drawers and we had resonable substitutions to build a circuit that could count. Yes, he put it together on the breadboard, following the diagram (adapted to the parts we had on hand). See his creation… Next planned upgrade is to make it count by itself (555 timer to the rescue).
BUILDING A ROOT CA AND AN INTERMEDIATE CA USING OPENSSL on UBUNTU
Setting Up a Certificate Authority on Ubuntu
This guide is an update to the previous “BUILDING A ROOT CA AND AN INTERMEDIATE CA USING OPENSSL AND DEBIAN STRETCH“. In this guide, we’ll walk you through setting up a Certificate Authority (CA) on Ubuntu. This will include creating a Root CA, an Intermediate CA, and generating certificates for your server. Please be aware that this setup is intended for educational purposes and not suitable for production environments.
Prerequisites
Before we begin, ensure you have a fresh Ubuntu installation. There’s no need for a graphical user interface; command-line access is sufficient. Additionally, you may want to install OpenSSH for remote administration and NTP for accurate timekeeping:
$ sudo apt update
$ sudo apt upgrade
$ sudo apt install openssh-server
$ sudo dpkg-reconfigure tzdata # Set your timezone
$ sudo apt install ntp # Optional for time synchronization
Getting the Configuration Files
Download the following configuration files and remove the “.txt” extension after downloading:
Setting Up the Root CA
Root CA Directory Structure:
Create the necessary directories for the Root CA:
$ sudo mkdir /root/ca
$ sudo mkdir /root/ca/newcerts /root/ca/certs /root/ca/crl /root/ca/private /root/ca/requests
Initializing Files:
Initialize essential files:
$ sudo touch /root/ca/index.txt /root/ca/index.txt.attr $ sudo echo '1000' > /root/ca/serialEdit Configuration: Copy openssl_root.cnf to /root/ca and customize it according to your requirements.
Generate the Root Key:
Create the Root private key (remember to replace “DOMAINNAME” with your desired domain):
$ sudo openssl genpkey -algorithm RSA -aes256 -out /root/ca/private/ca.DOMAINNAME.key.pem -aes256 -algorithm RSA -aes256 -out /root/ca/private/ca.DOMAINNAME.key.pem 4096Sign the Root Certificate:
Sign the Root Certificate with the Root private key:
$ sudo openssl req -config /root/ca/openssl_root.cnf -key /root/ca/private/ca.DOMAINNAME.key.pem -new -x509 -sha512 -extensions v3_ca -out /root/ca/certs/ca.DOMAINNAME.crt.pem -days 3650 -set_serial 0Creating an Intermediate CA
Intermediate CA Structure:
Set up directories for the Intermediate CA:
$ sudo mkdir /root/ca/intermediate
$ sudo mkdir /root/ca/intermediate/newcerts /root/ca/intermediate/certs /root/ca/intermediate/crl /root/ca/intermediate/csr /root/ca/intermediate/private
Initializing Files (Again):
Initialize index and serial files:
$ sudo touch /root/ca/intermediate/index.txt /root/ca/intermediate/index.txt.attr sudo echo '1000' > /root/ca/intermediate/crlnumber sudo echo '1234' > /root/ca/intermediate/serialEdit Intermediate Configuration:
Copy openssl_intermediate.cnf to /root/ca/intermediate and tailor it to your needs.
Generate Intermediate Key and CSR:
Create the private key and CSR for the Intermediate
$ sudo openssl req -config /root/ca/intermediate/openssl_intermediate.cnf -keyout /root/ca/intermediate/private/int.DOMAINNAME.key.pem -newkey rsa:4096 -nodes -out /root/ca/intermediate/csr/int.DOMAINNAME.csrSign the Intermediate Certificate:
Sign the Intermediate CA certificate with the Root CA:
$ sudo openssl ca -config /root/ca/openssl_root.cnf -extensions v3_intermediate_ca -days 3650 -notext -md sha512 -in /root/ca/intermediate/csr/int.DOMAINNAME.csr -out /root/ca/intermediate/certs/int.DOMAINNAME.crt.pemGenerating Server Certificates
Copy Configuration for Server Certificates:
Copy openssl_csr_san.cnf into /root/ca/intermediate. Customize the [alt_names] section to match your server’s DNS entries.
Generate Key and CSR for the Server:
Generate the key and CSR for your server, replacing “www.example.com” with your server’s FQDN:
$ sudo openssl req -out /root/ca/intermediate/csr/www.example.com.csr.pem -newkey rsa:2048 -nodes -keyout /root/ca/intermediate/private/www.example.com.key.pem -config /root/ca/intermediate/openssl_csr_san.cnf
Create the Server Certificate:
Sign the server certificate (replace “www.example.com” with your server’s FQDN):
$ sudo openssl ca -config /root/ca/intermediate/openssl_intermediate.cnf -extensions server_cert -days 3750 -notext -md sha512 -in /root/ca/intermediate/csr/www.example.com.csr.pem -out /root/ca/intermediate/certs/www.example.com.crt.pemCreating a Combined Certificate for Apache
Combined Certificate for Apache:
To prepare a combined certificate suitable for Apache, execute the following commands (again, replace “www.example.com” with your server’s FQDN):
$ sudo openssl pkcs12 -inkey /root/ca/intermediate/private/www.example.com.key.pem -in /root/ca/intermediate/certs/www.example.com.crt.pem -export -out /root/ca/intermediate/certs/www.example.com.combined.pfx sudo openssl pkcs12 -in /root/ca/intermediate/certs/www.example.com.combined.pfx -nodes -out /root/ca/intermediate/certs/www.example.com.combined.crtThere you have it! You’ve successfully set up a Root CA, an Intermediate CA, and created server certificates, including a combined certificate ready for use with Apache on your Ubuntu system. Remember to replace “www.example.com” and “DOMAINNAME” with your specific values as needed throughout the process.
The Stanley Quencher H2.0 FlowState Tumbler: Keeping It Cool with Style

When it comes to vacuum-insulated tumblers, the market is flooded with options, each promising to keep your beverages hot or cold for extended periods. The Stanley Quencher H2.0 FlowState Stainless Steel Tumbler is one such contender, and it certainly has some noteworthy features that set it apart from the competition.
Design and Build (4/5): The Stanley Quencher H2.0 boasts a sleek and sturdy stainless steel construction, which not only looks stylish but also feels durable. The tumbler’s matte finish is not only aesthetically pleasing but also offers a secure grip. Its 30-ounce capacity strikes a balance between portability and ample beverage storage.
Insulation Performance (4.5/5): The highlight of the Quencher H2.0 is its FlowState technology, which is claimed to provide industry-leading insulation. In practice, it lives up to the hype. Cold drinks stay refreshingly chilled for hours on end, and hot beverages maintain their warmth impressively. The tumbler’s lid, which is designed to be spill-resistant, helps in retaining temperature while preventing accidental leaks.
Ease of Use (4/5): The tumbler’s lid features a convenient sliding spout for sipping and a twist-and-pour mechanism for controlled flow. It’s easy to use and minimizes spillage. However, the lid’s complexity can make it challenging to clean thoroughly, with multiple components to disassemble and reassemble.
Portability (3.5/5): The Stanley Quencher H2.0 is bulkier than some of its competitors, which can be both an advantage and a drawback. On the one hand, it fits comfortably in most cup holders and provides ample liquid storage. On the other hand, its size might be a bit much for those looking for a more compact travel companion.
Price and Value (3.5/5): While the Stanley Quencher H2.0 offers exceptional insulation performance, its price point is on the higher end of the spectrum. There are certainly more affordable tumblers available that offer similar temperature retention capabilities. Whether it’s worth the investment depends on how much you value the brand’s reputation and the unique FlowState technology.
Comparison to Similar Items: Compared to the widely popular Yeti Rambler, the Stanley Quencher H2.0 holds its own. Both offer top-tier insulation and rugged stainless steel construction. The choice between the two may come down to personal preference in terms of design and brand loyalty, as well as budget considerations.
In summary, the Stanley Quencher H2.0 FlowState Stainless Steel Tumbler is a reliable and stylish choice for those who prioritize exceptional temperature retention and are willing to pay a premium for it. While it faces stiff competition from other high-quality tumblers, its unique FlowState technology and robust construction make it a worthy contender in the market. If you’re after a tumbler that can keep your drinks hot or cold for extended periods while looking good doing it, the Stanley Quencher H2.0 is certainly worth considering.
Narwal Freo Robot Vacuum and Mop Review: Cleaning Innovation at Its Finest

The Narwal Freo Robot Vacuum and Mop is a cutting-edge cleaning solution that combines the convenience of a robot vacuum with the efficiency of a mop. In this review, we’ll delve into its specifications and compare it to two other robotic vacuum-mop hybrids to help you make an informed choice.
Specifications (4.5/5):
- Cleaning Modes: The Narwal Freo offers three cleaning modes: vacuuming, mopping, and a combination of both. This versatility ensures thorough cleaning for various floor types, from hardwood to tile.
- Navigation Technology: Equipped with advanced LIDAR (Light Detection and Ranging) navigation, the Freo maps your home in real-time, creating a precise cleaning path. This enhances efficiency and avoids obstacles effectively.
- Cleaning Performance: With a 3,000 Pa strong suction power, it effectively removes dirt, dust, and debris. The mopping function uses a water tank and microfiber cloth to leave your floors spotless.
- Battery Life: The Freo boasts a generous 5,200mAh battery, providing up to 3 hours of runtime on a single charge, which is ample for most homes.
- Self-Cleaning: One standout feature is the Freo’s ability to self-clean its mop cloth and empty its dustbin into a separate dock. This means less maintenance and a more hands-off cleaning experience.
- App Control: You can control and schedule the Freo using the Narwal app, which also allows for customized cleaning zones and virtual boundaries.
- Compatibility: It works well on both hard floors and low to medium-pile carpets, making it versatile for different types of surfaces.
Performance (4.5/5):
The Narwal Freo excels in performance and convenience. Its advanced navigation ensures it covers every inch of your home efficiently, and the powerful suction and mop function leave your floors remarkably clean. The self-cleaning feature is a game-changer, reducing the effort needed to maintain the robot.
Comparison to Similar Robotic Vacuum-Mop Hybrids:
- Narwal Freo vs. Roborock S7:
- The Roborock S7 is another popular robot vacuum-mop hybrid with impressive features. It boasts a sonic mop that scrubs floors with high-frequency vibrations, which some users may find more effective for deep cleaning. However, the Narwal Freo’s self-cleaning capabilities set it apart, making it a more hands-off option.
- Narwal Freo vs. iRobot Braava Jet M6:
- The iRobot Braava Jet M6 is focused primarily on mopping and is designed to work alongside iRobot’s Roomba vacuums. While the M6 offers excellent mopping capabilities, it lacks the Freo’s integrated vacuum, which means you’d need a separate robot vacuum for complete cleaning.
Conclusion: The Narwal Freo Robot Vacuum and Mop is a game-changer in the world of robotic cleaning. Its advanced navigation, self-cleaning features, and versatile cleaning modes make it a standout choice for those seeking a truly hands-off cleaning experience. While it faces competition from other hybrid models, its unique capabilities set it apart, making it a top contender for a cleaner, more convenient home.
Automatically connect to Private Internet Access VPN using OpenVPN client on Raspbian Stretch
Introduction
A Virtual Private Network establishes a secure encrypted connection between your system and a server. It allows you to connect to an untrusted network and tunnel all your network traffic so that it emerges from the VPN server to its destination. In this howto, we will configure the OpenVPN client to connect to the VPN servers hosted by Private Internet Access.
I’ve chosen to use Private Internet Access only because I already have an account with them and they support the OpenVPN client to connect to their VPN servers. I’m sure other VPN service providers would work the same way.
Although I initially tested this on Raspbian Stretch on a Raspberry Pi, I have since used the same steps on Debian Stretch and achieved the same results.
Installing all the prerequisites
To accomplish this task we are going to need to install openvpn, unzip, wget, curl and openresolv. We can do this by using the following command:
apt -y install openvpn unzip wget curl openresolv Setting up the directory structure
Just to keep things organized we will create a set of directories. This will help if we ever need to alter the configuration by only requiring the change of a couple of linked files. First we need to switch to “/etc/openvpn/client directory”.
cd /etc/openvpn/clientOnce there we create several directories by issuing the following commands:
mkdir certs-available
mkdir confs-available
mkdir login-available
mkdir certs-enabled
mkdir login-enabled
mkdir vpn-bundles
Setting up all the configurations
Private Internet Access (as well as other VPN providers) provide configuration bundles for the OpenVPN default client. We are going to download those configurations, alter them a bit and use them to connect to the PIA VPN server as soon as our system finishes booting up.
Switch to the directory we created to store the configuration bundle by issuing the following command:
cd /etc/openvpn/client/vpn-bundlesOnce in /etc/openvpn/client/vpn-bundles we can proceed to download the configuration bundle with wget by issuing the following:
wget https://www.privateinternetaccess.com/openvpn/openvpn.zipNow that we have the zipped file with all the configurations we need to unzip it by using the following command:
unzip openvpn.zip -d "$(date +"%d-%m-%Y")"-PIA-openvpnThis command will unzip the openvpn.zip file into a directory whose name starts with the date followed by “-PIA-openvpn”. We are doing this so that in the future if there is a need to download a new set of configurations we can easily tell which directory contains the newly downloaded ones.
Once the file is unzipped we can start moving the configurations to the directories we previously created.
cd "$(date +"%d-%m-%Y")"-PIA-openvpn
mkdir /etc/openvpn/client/certs-available/PIA
cp *.crt /etc/openvpn/client/certs-available/PIA/
cp *.pem /etc/openvpn/client/certs-available/PIA/
mkdir /etc/openvpn/client/confs-available/PIA
cp *.ovpn /etc/openvpn/client/confs-available/PIA/
Because we want the OpenVPN client to start without user interaction, we need to add a couple of settings to all VPN configuration files we just downloaded. Change to the directory where we stored them by issuing the following command:
cd /etc/openvpn/client/confs-available/PIAWe need to alter all the configuration files so that they can get the user name and password from a file named “login” located at “/etc/openvpn/client/login-enabled/”. This can be accomplished by issuing the following command:
sed -i 's/auth-user-pass/auth-user-pass \/etc\/openvpn\/client\/login-enabled\/login/g' *.ovpnWe also need to add the following settings to all the configuration files. These settings deal with changing the DNS servers in order to prevent DNS leaks when the VPN is up.
script-security 2
up /etc/openvpn/update-resolv-conf
down /etc/openvpn/update-resolv-conf
down-pre
Going into each file to add the aforementioned settings would be too tedious, it is better to use a small script that goes into each file and adds the settings. The script is simple, just create a file named add_vpn_settings.sh with the following content:
#/bin/bash
cd /etc/openvpn/client/confs-available/PIA
for file in *
 do
     echo "script-security 2" >> "$file"
     echo "up /etc/openvpn/update-resolv-conf" >> "$file"
     echo "down /etc/openvpn/update-resolv-conf" >> "$file"
     echo "down-pre" >> "$file"
 done
Next step is to make executable by issuing the following:
chmod +x add_vpn_settings.shAnd finally we run the add_vpn_settings.sh script by issuing:
./add_vpn_settings.shNow we need to backup the original update-resolv-conf file, this is because we are going to use a replacement that is better able to update the DNS servers in /etc/resolv.conf when they are pushed in by the VPN server. We can do this be issuing the following commands:
cd /etc/openvpn
mv update-resolv-conf update-resolv-conf-ORIG
If we ever need to return to the default script we just rename “update-resolv-conf-ORIG” back to “update-resolv-conf “.
Next we need to download the replacement update-resolv-conf file from https://github.com/masterkorp/openvpn-update-resolv-conf. We can issue the following commands to accomplish this:
cd /etc/openvpn
wget https://github.com/masterkorp/openvpn-update-resolv-conf/raw/master/update-resolv-conf.sh
Now we rename it and make it executable:
mv update-resolv-conf.sh update-resolv-conf
chown root:root update-resolv-conf
chmod 555 update-resolv-conf
Next we need to create a the file that contains the actual username and password for the PIA VPN server. Issuing the following three commands should do the job:
cd /etc/openvpn/client/login-available
echo "YOUR_PIA_USERNAME" > PIA-Login
echo "YOUR_PIA_PASSWORD" >> PIA-Login
Now we create a link from /etc/openvpn/client/login-available to /etc/openvpn/client/login-enabled/login by issuing the following:
ln -s /etc/openvpn/client/login-available/PIA-Login /etc/openvpn/client/login-enabled/loginFinally we link one of the configurations available to be the default one (I’ve used the UK London configuration as an example below, you can use whichever configuration you desire).
ln -s /etc/openvpn/client/confs-available/PIA/UK\ London.ovpn /etc/openvpn/default.confAfter a reboot, the openvpn client should be up and everything should be flowing through the vpn tunnel.
Setting up a mining system with xmr-stak built from source and Ubuntu 16.04
If using an Nvidia GPU, install the Nvidia CUDA toolkit:
Download installer type “deb(network)” from:
To install issue the following commands:
$ sudo dpkg -i cuda-repo-ubuntu1604_9.1.85-1_amd64.deb
$ sudo apt-key adv --fetch-keys http://developer.download.nvidia.com/compute/cuda/repos/ubuntu1604/x86_64/7fa2af80.pub
$ sudo apt-get update
$ sudo apt-get install cuda
Editing the enviroment to include the CUDA path:
$ sudo nano /etc/environment
Find the PATH variable and include the /usr/local/cuda-9.1/bin folder at the end of the string.
Save the file and reboot.
If using and AMG GPU, install AMD APP SDK 3.0:
Download and install the latest version from:
http://developer.amd.com/amd-accelerated-parallel-processing-app-sdk/
Untar the SDK to a location of your choice.
Decompress the file wit the following command:
$ tar -xvjf AMD-APP-SDKInstaller-v<3.0.x.y>-GA-linux64.tar.bz2
Run the installer:
$ sudo ./AMD-APP-SDKInstaller-v<3.0.x.y>-GA-linux64.sh
To fix libOpenCL issue:
$ cd $AMDAPPSDKROOT/lib/x86_64
$ sudo ln -sf sdk/libOpenCL.so.1 libOpenCL.so
then logout and login again.
Installing amdgpu-pro
Download the latest package from:
https://support.amd.com/en-us/kb-articles/Pages/AMDGPU-PRO-Driver-for-Linux-Release-Notes.aspx
Decompress the file wit the following command:
$ tar -xJvf amdgpu-pro-17.40-492261.tar.xz
$ cd amdgpu-pro-17.40-492261
$ sudo ./amd-pro-install -y
Reference:
https://linuxconfig.org/install-amdgpu-pro-16-50-on-ubuntu-16-04-xenial-xerus-linux
Building xmr-stak from source
Install all dependencies:
$ sudo apt install git libmicrohttpd-dev libssl-dev cmake build-essential libhwloc-dev
Create a directory for the source files and clone the source:
$ mkdir GIT-sources
$ cd GIT-sources
$ git clone https://github.com/fireice-uk/xmr-stak.git
Create a build directory:
$ mkdir xmr-stak/build
$ cd xmr-stak/build
Configuring and building xmr-stak
If building xmr-stak for CPU only mining and without http server support, use the following cmake flags:
$ cmake .. -DCUDA_ENABLE=FALSE -DOpenCL_ENABLE=FALSE -DMICROHTTPD_ENABLE=FALSE
If building xmr-stak for AMD GPU mining and CPU mining, use the following cmake flags:
$ cmake .. -DCUDA_ENABLE=FALSE
If building xmr-stak for Nvidia GPU and CPU mining, use the following cmake flags:
$ cmake .. -DOpenCL_ENABLE=FALSE
If building for all (AMD GPU, Nvidia GPU and CPU mining)
$ cmake ..
After cmake finishes, execute the following to build:
$ make -j4 install
Final system configurations
If using GPU mining (Nvidia GPU or AMD GPU), ensure the user you will use to mine is part of the video group in /etc/group
$ sudo usermod -a -G video $LOGNAME
Enabling Large Page Support for AMDGPU-PRO
Edit /etc/default/grub and add GRUB_CMDLINE_LINUX=”amdgpu.vm_fragment_size=9″
After editing ggrub, do:
$ sudo update-grub
$ sudo reboot
Configuring Large Page Support for Operating system (applies to all GPUs and CPUs)
Create a file named 98-HugePages-miner.conf in /etc/sysctl.d with the following content:
############################
vm.nr_hugepages=128
############################
Add the following lines to /etc/security/limits.conf (where “miner” is the name of your mining account):
############################
miner soft memlock 262144
miner hard memlock 262144
############################
Then reboot with:
$ reboot
You will find the xmr-stak binary in ~/GIT-sources/xmr-stak/build/bin. Run xmr-stak and follow the prompts to begin mining.
Building a Root CA and an Intermediate CA using OpenSSL and Debian Stretch
A bit of background
A Root Certificate Authority is used to issue digital certificates to servers, clients or users. It generates digital certificates that certify the ownership of a public key, allowing others to trust the certificate.
An Intermediate Certificate is a subordinate certificate issued by a Root certificate authority for the purpose of issuing certificates. This creates a certificate chain that begins in the Root CA, through the intermediate and ending in the issued certificate. This establishes a chain of trust that can verify the validity of a certificate.
In this post, we will step through the process of creating a Root CA, then an Intermediate CA and finally sign digital certificates for a server. A bit of warning, this setup should be sufficient for a homelab or a small local setup; you should not use this as a production service.
Prepare to build
Install Debian Stretch, the minimum should suffice. There is no need any GUI. Install SSH for ease of administration and to transfer you certificates securely out.
Make sure that the Fully Qualified Domain Name of the computer is set correctly.
Make sure your time zone is correctly set.
Make sure the time and date are correctly set.
If you wish you can install ntp to ensure time is always correct.
# apt install ntp
Download the following configuration files:
After download rename all of them by dropping the “.txt” extension.
Creating the Root CA
Create the directory structure for the Root CA:
# mkdir /root/ca
# cd /root/ca
# mkdir newcerts certs crl private requests
While at /root/ca we should also create “index.txt” file for OpenSSL to keep track of all signed certificates and the “serial” file to give the start point for each signed certificate’s serial number. This can be accomplished by doing the following:
# cd /root/ca
# touch index.txt
# touch index.txt.attr
# echo '1000' > serial
Copy openssl_root.cnf to /root/ca, edit it and look for the following entries:
# The root key and root certificate.
private_key = $dir/private/ca.DOMAINNAME.key.pem
certificate = $dir/certs/ca.DOMAINNAME.cert.pem
# For certificate revocation lists.
crlnumber = $dir/crlnumber
crl = $dir/crl/ca.DOMAINNAME.crl.pem
crl_extensions = crl_ext
default_crl_days = 30
Change DOMAINNAME to something that matches the domain of your network, this isn’t strictly necessary but it makes for a more customized naming convention.
Generate the Root private key
(change DOMAINNAME to match what you used in the openssl_root.cnf):
# cd /root/ca
# openssl genrsa -aes256 -out private/ca.DOMAINNAME.key.pem 4096
Signing the Root Certificate
Use the root private key to sign the root certificate.
(change DOMAINNAME to match what you used in the openssl_root.cnf):
# openssl req -config openssl_root.cnf -new -x509 -sha512 -extensions v3_ca -key /root/ca/private/ca.DOMAINNAME.key.pem -out /root/ca/certs/ca.DOMAINNAME.crt.pem -days 3650 -set_serial 0
Ensure that when filling out the “Common Name” variable that you use the CA server + Domain name of the network
Creating an Intermediate Certificate Authority
Create a directory to separate the intermediary files from our root configuration
# mkdir /root/ca/intermediate
Also all the directories and files needed to support (similar to the ones we created for the Root CA):
# cd /root/ca/intermediate
# mkdir certs newcerts crl csr private
# touch index.txt
# touch index.txt.attr
# echo 1000 > /root/ca/intermediate/crlnumber
# echo '1234' > serial
Copy openssl_intermediate.cnf to /root/ca/intermediate, edit it and look for the following entries:
# The root key and root certificate.
private_key = $dir/private/int.DOMAINNAME.key.pem
certificate = $dir/certs/int.DOMAINNAME.crt.pem
# For certificate revocation lists.
crlnumber = $dir/crlnumber
crl = $dir/crl/int.DOMAINNAME.crl.pem
crl_extensions = crl_ext
default_crl_days = 30
Change DOMAINNAME to the same thing that you used in openssl_root.cnf
Creating the private key and certificate signing request for the Intermediate CA
(change DOMAINNAME to the value you’ve been using so far)
# cd /root/ca
# openssl req -config /root/ca/intermediate/openssl_intermediate.cnf -new -newkey rsa:4096 -keyout /root/ca/intermediate/private/int.DOMAINNAME.key.pem -out /root/ca/intermediate/csr/int.DOMAINNAME.csr
Creating the intermediate certificate
(change DOMAINNAME to the value you’ve been using so far)
# openssl ca -config /root/ca/openssl_root.cnf -extensions v3_intermediate_ca -days 3650 -notext -md sha512 -in /root/ca/intermediate/csr/int.DOMAINNAME.csr -out /root/ca/intermediate/certs/int.DOMAINNAME.crt.pem
** Notice that the root CA configurtion (openssl_root.cnf) is used.
Creating the certificate chain
# cd /root/ca
# cat intermediate/certs/int.DOMAINNAME.crt.pem certs/ca.DOMAINNAME.crt.pem > intermediate/certs/chain.DOMAINNAME.crt.pem
What are all these files for?
So now that you have created all these files, which ones are the ones you need?
In /root/ca/certs, ca.DOMAINNAME.crt.pem is the Root CA certificate.
In /root/ca/intermediate/certs, int.DOMAINNAME.crt.pem is the Intermediate CA certificate.
In /root/ca/intermediate/certs, chain.DOMAINNAME.crt.pem is the concatenation of the Root CA certificate and the Intermediate CA certificate.
Creating server certificates
Copy openssl_csr_san.cnf to /root/ca/intermediate, edit it and change the entries under [alt_names] so that the DNS.* entries match the Fully Qualified Domain Name of the server you wish to create a certificate for. This will create a certificate with embedded Subject Alternative Name (SANs), so no more warnings from Chrome about NET::ERR_CERT_AUTHORITY_INVALID.
Creating the key and certificate signing request
(change “www.example.com” to your server’s FQDN)
# cd /root/ca
# openssl req -out intermediate/csr/www.example.com.csr.pem -newkey rsa:2048 -nodes -keyout intermediate/private/www.example.com.key.pem -config intermediate/openssl_csr_san.cnf
Creating the certificate by signing the signing request with the intermediate CA
(change “www.example.com” to your server’s FQDN)
# cd /root/ca
# openssl ca -config intermediate/openssl_intermediate.cnf -extensions server_cert -days 3750 -notext -md sha512 -in intermediate/csr/www.example.com.csr.pem -out intermediate/certs/www.example.com.crt.pem
In /root/ca/intermediate/certs you should now have a certificate for use in the server (www.example.com in the case of the example).
Creating a combined certificate for use with Apache server
(change “www.example.com” to your server’s FQDN)
# openssl pkcs12 -inkey www.example.com.key.pem -in www.example.com.crt.pem -export -out www.example.com.combined.pfx
# openssl pkcs12 -in www.example.com.combined.pfx -nodes -out www.example.com.combined.crt
Installing Guacamole 0.9.13 from source on Debian Stretch and Tomcat 8
Install build tools:
# apt install build-essential maven checkinstall
Install JDK, database and application server:
# apt install openjdk-8-jdk mariadb-server \
mariadb-client mariadb-common tomcat8
Secure your mysql/mariadb installation:
# mysql_secure_installation
Take note of the mysql root password you just created.
Install Guacamole build dependencies:
# apt install libcairo2-dev libjpeg62-turbo-dev \
libpng-dev libossp-uuid-dev libavcodec-dev \
libavutil-dev libswscale-dev libfreerdp-dev \
libpango1.0-dev libssh2-1-dev libtelnet-dev \
libvncserver-dev libpulse-dev libssl-dev \
libvorbis-dev libwebp-dev ghostscript freerdp
Untar the sources:
$ tar -xvzf guacamole-client-0.9.13-incubating.tar.gz
$ tar -xvzf guacamole-server-0.9.13-incubating.tar.gz
Untar the database related parts:
$ tar -xvzf guacamole-auth-jdbc-0.9.13-incubating.tar.gz
$ tar -xvzf mysql-connector-java-5.1.45.tar.gz
Build Guacamole Server
$ cd guacamole-server-0.9.13-incubating
$ ./configure --with-init-dir=/etc/init.d
$ make -j2
$ sudo make install
– or –
$ sudo checkinstall --pkgname=guacamole-guacd -D make install
If using checkinstall should get an output similar to this:
####################################################
*****************************************
**** Debian package creation selected ***
*****************************************
This package will be built according to these values:
0 – Maintainer: [ root@vm ]
1 – Summary: [ Guacamole Guacd ]
2 – Name: [ guacamole-guacd ]
3 – Version: [ incubating ]
4 – Release: [ 1 ]
5 – License: [ GPL ]
6 – Group: [ checkinstall ]
7 – Architecture: [ amd64 ]
8 – Source location: [ guacamole-server-0.9.13-incubating ]
9 – Alternate source location: [ ]
10 – Requires: [ ]
11 – Provides: [ guacamole-guacd ]
12 – Conflicts: [ ]
13 – Replaces: [ ]
Enter a number to change any of them or press ENTER to continue:
####################################################
Enter the number [3] to change the Version from “incubating” to 0.9.13
You should end up with something like this:
####################################################
This package will be built according to these values:
0 – Maintainer: [ root@vm ]
1 – Summary: [ Guacamole Guacd ]
2 – Name: [ guacamole-guacd ]
3 – Version: [ 0.9.13 ]
4 – Release: [ 1 ]
5 – License: [ GPL ]
6 – Group: [ checkinstall ]
7 – Architecture: [ amd64 ]
8 – Source location: [ guacamole-server-0.9.13-incubating ]
9 – Alternate source location: [ ]
10 – Requires: [ ]
11 – Provides: [ guacamole-guacd ]
12 – Conflicts: [ ]
13 – Replaces: [ ]
Enter a number to change any of them or press ENTER to continue:
####################################################
Press [Enter] to continue and wait for checkinstall to install and build a package
If you ever need to remove the guacamole and you used checkinstall you can do it with:
# dpkg -r guacamole-guacd
Link all the freerdp libraries to the system freerdp library location:
$ sudo ln -s /usr/local/lib/freerdp/* /usr/lib/x86_64-linux-gnu/freerdp/.
Run ldconfig:
# ldconfig -v
Build Guacamole Client:
$ cd ..
$ cd guacamole-client-0.9.13-incubating
$ mvn package
Create the directories to hold extensions and libraries:
# mkdir /etc/guacamole
# mkdir /etc/guacamole/lib
# mkdir /etc/guacamole/extensions
# mkdir /var/lib/guacamole
Deploying the Guacamole:
$ sudo cp guacamole/target/guacamole-0.9.13-incubating.war /var/lib/guacamole/
$ sudo ln -s /var/lib/guacamole/guacamole-0.9.13-incubating.war /var/lib/tomcat8/webapps/guacamole.war
Creating the properties file:
In /etc/guacamole create a file called guacamole.properties with the following content:
####################################################
# Hostname and port of guacamole proxy
guacd-hostname: localhost
guacd-port: 4822
guacamole.home: /etc/guacamole
#MySQL Properties
mysql-hostname: localhost
mysql-port: 3306
mysql-database: guacamole_db
mysql-username: [Guacamole_DB_USERNAME]
mysql-password: [Guacamole_DB PASSWORD]
####################################################
Make sure you take note of the [Guacamole_DB_USERNAME] and [Guacamole_DB PASSWORD] you decide to put in this file. They will be used later on to set up the database.
Link /etc/guacamole to tomcat home directory:
$ sudo ln -s /etc/guacamole /var/lib/tomcat8/.guacamole
Deploy database authentication:
$ cd ..
$ cd guacamole-auth-jdbc-0.9.13-incubating
$ sudo cp mysql/guacamole-auth-jdbc-mysql-0.9.13-incubating.jar /etc/guacamole/extensions/
$ cd ..
$ cd mysql-connector-java-5.1.45
$ sudo cp mysql-connector-java-5.1.45-bin.jar /etc/guacamole/lib/
Create the database:
# mysql -u root -p[MYSQL_ROOT_PASSWORD]
create database guacamole_db;
create user '[Guacamole_DB_USERNAME]'@'localhost' identified by '[Guacamole_DB PASSWORD]';
GRANT SELECT,INSERT,UPDATE,DELETE ON guacamole_db.* TO '[Guacamole_DB_USERNAME]'@'localhost';
flush privileges;
quit
Populate the database:
# cat guacamole-auth-jdbc-0.9.13-incubating/mysql/schema/*.sql | mysql -u root -p[MYSQL_ROOT_PASSWORD] guacamole_db
Ensure that guacd is enabled:
# systemctl enable guacd
and finally reboot…
If you ever need to backup the database:
# mysqldump -u root -p --add-drop-table guacamole_db > guacamole_db.sql
To restore the backup:
# mysql -u root -p guacamole_db < guacamole_db.sql
To further lockdown the installation
Fix permisions of guacamole.properties so only tomcat can read it by issuing the following:
# cd /etc/guacamole
# chown root:tomcat8
# chmod 640 guacamole.properties