My son asked me, “Dad, can we make a circuit that turns a light on when it is dark?”… Went to the parts drawers, got some stuff together, drew up the circuit and he put it together on a breadboard. Notice the new breadboard, had to order some from Amazon as I ran out of them.
Monthly Archives: September 2023
A Counter using a 555 Timer
So my son wanted to expand the functions of the circuit we put together. He asked if we could make it count by itself and then proceeded to show me how it does this on his laptop… Ok, went through the parts drawers again and found suitable replacements for the parts needed (555 is the main thing). I drew up the design for the circuit and he put it together.
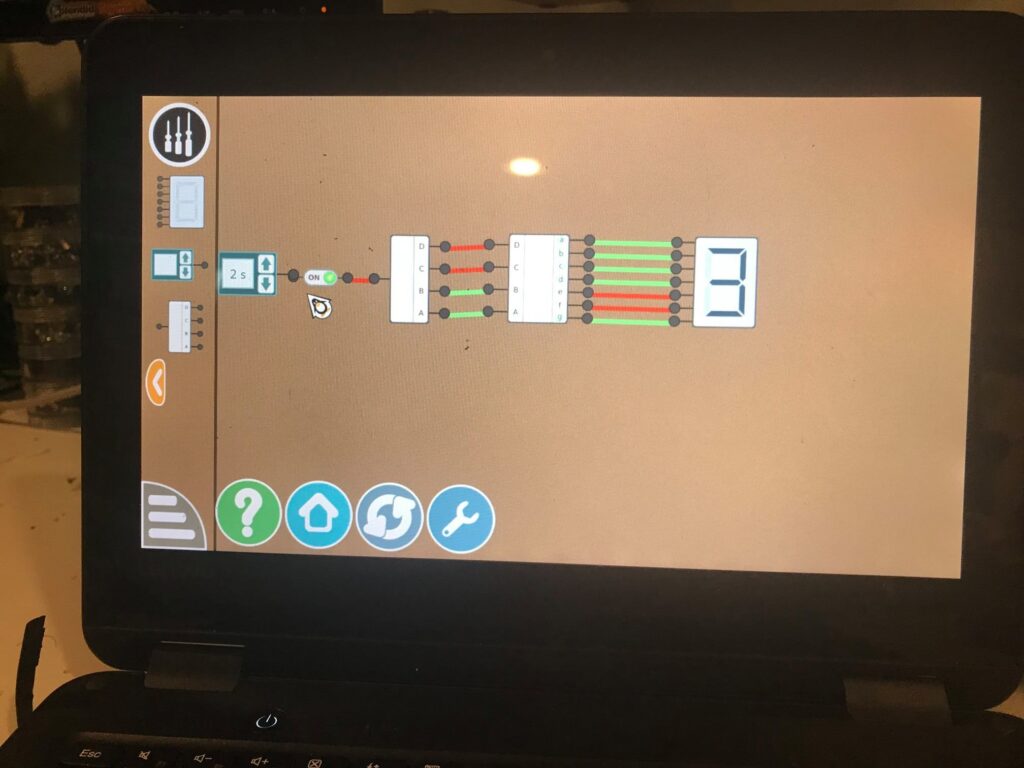
A simple counter circuit
So my son was playing on his laptop and found a circuit simulation program that is part of GCompris (Open Source Educational software). He “desgined” a simple counter on it, when I saw what he made I asked him if he wanted to make it with real parts… He said yes. A bit of searching in my spare parts drawers and we had resonable substitutions to build a circuit that could count. Yes, he put it together on the breadboard, following the diagram (adapted to the parts we had on hand). See his creation… Next planned upgrade is to make it count by itself (555 timer to the rescue).

BUILDING A ROOT CA AND AN INTERMEDIATE CA USING OPENSSL on UBUNTU
Setting Up a Certificate Authority on Ubuntu
This guide is an update to the previous “BUILDING A ROOT CA AND AN INTERMEDIATE CA USING OPENSSL AND DEBIAN STRETCH“. In this guide, we’ll walk you through setting up a Certificate Authority (CA) on Ubuntu. This will include creating a Root CA, an Intermediate CA, and generating certificates for your server. Please be aware that this setup is intended for educational purposes and not suitable for production environments.
Prerequisites
Before we begin, ensure you have a fresh Ubuntu installation. There’s no need for a graphical user interface; command-line access is sufficient. Additionally, you may want to install OpenSSH for remote administration and NTP for accurate timekeeping:
$ sudo apt update
$ sudo apt upgrade
$ sudo apt install openssh-server
$ sudo dpkg-reconfigure tzdata # Set your timezone
$ sudo apt install ntp # Optional for time synchronization
Getting the Configuration Files
Download the following configuration files and remove the “.txt” extension after downloading:
Setting Up the Root CA
Root CA Directory Structure:
Create the necessary directories for the Root CA:
$ sudo mkdir /root/ca
$ sudo mkdir /root/ca/newcerts /root/ca/certs /root/ca/crl /root/ca/private /root/ca/requests
Initializing Files:
Initialize essential files:
$ sudo touch /root/ca/index.txt /root/ca/index.txt.attr $ sudo echo '1000' > /root/ca/serialEdit Configuration: Copy openssl_root.cnf to /root/ca and customize it according to your requirements.
Generate the Root Key:
Create the Root private key (remember to replace “DOMAINNAME” with your desired domain):
$ sudo openssl genpkey -algorithm RSA -aes256 -out /root/ca/private/ca.DOMAINNAME.key.pem -aes256 -algorithm RSA -aes256 -out /root/ca/private/ca.DOMAINNAME.key.pem 4096Sign the Root Certificate:
Sign the Root Certificate with the Root private key:
$ sudo openssl req -config /root/ca/openssl_root.cnf -key /root/ca/private/ca.DOMAINNAME.key.pem -new -x509 -sha512 -extensions v3_ca -out /root/ca/certs/ca.DOMAINNAME.crt.pem -days 3650 -set_serial 0Creating an Intermediate CA
Intermediate CA Structure:
Set up directories for the Intermediate CA:
$ sudo mkdir /root/ca/intermediate
$ sudo mkdir /root/ca/intermediate/newcerts /root/ca/intermediate/certs /root/ca/intermediate/crl /root/ca/intermediate/csr /root/ca/intermediate/private
Initializing Files (Again):
Initialize index and serial files:
$ sudo touch /root/ca/intermediate/index.txt /root/ca/intermediate/index.txt.attr sudo echo '1000' > /root/ca/intermediate/crlnumber sudo echo '1234' > /root/ca/intermediate/serialEdit Intermediate Configuration:
Copy openssl_intermediate.cnf to /root/ca/intermediate and tailor it to your needs.
Generate Intermediate Key and CSR:
Create the private key and CSR for the Intermediate
$ sudo openssl req -config /root/ca/intermediate/openssl_intermediate.cnf -keyout /root/ca/intermediate/private/int.DOMAINNAME.key.pem -newkey rsa:4096 -nodes -out /root/ca/intermediate/csr/int.DOMAINNAME.csrSign the Intermediate Certificate:
Sign the Intermediate CA certificate with the Root CA:
$ sudo openssl ca -config /root/ca/openssl_root.cnf -extensions v3_intermediate_ca -days 3650 -notext -md sha512 -in /root/ca/intermediate/csr/int.DOMAINNAME.csr -out /root/ca/intermediate/certs/int.DOMAINNAME.crt.pemGenerating Server Certificates
Copy Configuration for Server Certificates:
Copy openssl_csr_san.cnf into /root/ca/intermediate. Customize the [alt_names] section to match your server’s DNS entries.
Generate Key and CSR for the Server:
Generate the key and CSR for your server, replacing “www.example.com” with your server’s FQDN:
$ sudo openssl req -out /root/ca/intermediate/csr/www.example.com.csr.pem -newkey rsa:2048 -nodes -keyout /root/ca/intermediate/private/www.example.com.key.pem -config /root/ca/intermediate/openssl_csr_san.cnf
Create the Server Certificate:
Sign the server certificate (replace “www.example.com” with your server’s FQDN):
$ sudo openssl ca -config /root/ca/intermediate/openssl_intermediate.cnf -extensions server_cert -days 3750 -notext -md sha512 -in /root/ca/intermediate/csr/www.example.com.csr.pem -out /root/ca/intermediate/certs/www.example.com.crt.pemCreating a Combined Certificate for Apache
Combined Certificate for Apache:
To prepare a combined certificate suitable for Apache, execute the following commands (again, replace “www.example.com” with your server’s FQDN):
$ sudo openssl pkcs12 -inkey /root/ca/intermediate/private/www.example.com.key.pem -in /root/ca/intermediate/certs/www.example.com.crt.pem -export -out /root/ca/intermediate/certs/www.example.com.combined.pfx sudo openssl pkcs12 -in /root/ca/intermediate/certs/www.example.com.combined.pfx -nodes -out /root/ca/intermediate/certs/www.example.com.combined.crtThere you have it! You’ve successfully set up a Root CA, an Intermediate CA, and created server certificates, including a combined certificate ready for use with Apache on your Ubuntu system. Remember to replace “www.example.com” and “DOMAINNAME” with your specific values as needed throughout the process.
The Stanley Quencher H2.0 FlowState Tumbler: Keeping It Cool with Style

When it comes to vacuum-insulated tumblers, the market is flooded with options, each promising to keep your beverages hot or cold for extended periods. The Stanley Quencher H2.0 FlowState Stainless Steel Tumbler is one such contender, and it certainly has some noteworthy features that set it apart from the competition.
Design and Build (4/5): The Stanley Quencher H2.0 boasts a sleek and sturdy stainless steel construction, which not only looks stylish but also feels durable. The tumbler’s matte finish is not only aesthetically pleasing but also offers a secure grip. Its 30-ounce capacity strikes a balance between portability and ample beverage storage.
Insulation Performance (4.5/5): The highlight of the Quencher H2.0 is its FlowState technology, which is claimed to provide industry-leading insulation. In practice, it lives up to the hype. Cold drinks stay refreshingly chilled for hours on end, and hot beverages maintain their warmth impressively. The tumbler’s lid, which is designed to be spill-resistant, helps in retaining temperature while preventing accidental leaks.
Ease of Use (4/5): The tumbler’s lid features a convenient sliding spout for sipping and a twist-and-pour mechanism for controlled flow. It’s easy to use and minimizes spillage. However, the lid’s complexity can make it challenging to clean thoroughly, with multiple components to disassemble and reassemble.
Portability (3.5/5): The Stanley Quencher H2.0 is bulkier than some of its competitors, which can be both an advantage and a drawback. On the one hand, it fits comfortably in most cup holders and provides ample liquid storage. On the other hand, its size might be a bit much for those looking for a more compact travel companion.
Price and Value (3.5/5): While the Stanley Quencher H2.0 offers exceptional insulation performance, its price point is on the higher end of the spectrum. There are certainly more affordable tumblers available that offer similar temperature retention capabilities. Whether it’s worth the investment depends on how much you value the brand’s reputation and the unique FlowState technology.
Comparison to Similar Items: Compared to the widely popular Yeti Rambler, the Stanley Quencher H2.0 holds its own. Both offer top-tier insulation and rugged stainless steel construction. The choice between the two may come down to personal preference in terms of design and brand loyalty, as well as budget considerations.
In summary, the Stanley Quencher H2.0 FlowState Stainless Steel Tumbler is a reliable and stylish choice for those who prioritize exceptional temperature retention and are willing to pay a premium for it. While it faces stiff competition from other high-quality tumblers, its unique FlowState technology and robust construction make it a worthy contender in the market. If you’re after a tumbler that can keep your drinks hot or cold for extended periods while looking good doing it, the Stanley Quencher H2.0 is certainly worth considering.
Narwal Freo Robot Vacuum and Mop Review: Cleaning Innovation at Its Finest

The Narwal Freo Robot Vacuum and Mop is a cutting-edge cleaning solution that combines the convenience of a robot vacuum with the efficiency of a mop. In this review, we’ll delve into its specifications and compare it to two other robotic vacuum-mop hybrids to help you make an informed choice.
Specifications (4.5/5):
- Cleaning Modes: The Narwal Freo offers three cleaning modes: vacuuming, mopping, and a combination of both. This versatility ensures thorough cleaning for various floor types, from hardwood to tile.
- Navigation Technology: Equipped with advanced LIDAR (Light Detection and Ranging) navigation, the Freo maps your home in real-time, creating a precise cleaning path. This enhances efficiency and avoids obstacles effectively.
- Cleaning Performance: With a 3,000 Pa strong suction power, it effectively removes dirt, dust, and debris. The mopping function uses a water tank and microfiber cloth to leave your floors spotless.
- Battery Life: The Freo boasts a generous 5,200mAh battery, providing up to 3 hours of runtime on a single charge, which is ample for most homes.
- Self-Cleaning: One standout feature is the Freo’s ability to self-clean its mop cloth and empty its dustbin into a separate dock. This means less maintenance and a more hands-off cleaning experience.
- App Control: You can control and schedule the Freo using the Narwal app, which also allows for customized cleaning zones and virtual boundaries.
- Compatibility: It works well on both hard floors and low to medium-pile carpets, making it versatile for different types of surfaces.
Performance (4.5/5):
The Narwal Freo excels in performance and convenience. Its advanced navigation ensures it covers every inch of your home efficiently, and the powerful suction and mop function leave your floors remarkably clean. The self-cleaning feature is a game-changer, reducing the effort needed to maintain the robot.
Comparison to Similar Robotic Vacuum-Mop Hybrids:
- Narwal Freo vs. Roborock S7:
- The Roborock S7 is another popular robot vacuum-mop hybrid with impressive features. It boasts a sonic mop that scrubs floors with high-frequency vibrations, which some users may find more effective for deep cleaning. However, the Narwal Freo’s self-cleaning capabilities set it apart, making it a more hands-off option.
- Narwal Freo vs. iRobot Braava Jet M6:
- The iRobot Braava Jet M6 is focused primarily on mopping and is designed to work alongside iRobot’s Roomba vacuums. While the M6 offers excellent mopping capabilities, it lacks the Freo’s integrated vacuum, which means you’d need a separate robot vacuum for complete cleaning.
Conclusion: The Narwal Freo Robot Vacuum and Mop is a game-changer in the world of robotic cleaning. Its advanced navigation, self-cleaning features, and versatile cleaning modes make it a standout choice for those seeking a truly hands-off cleaning experience. While it faces competition from other hybrid models, its unique capabilities set it apart, making it a top contender for a cleaner, more convenient home.